It was one of those editing nights where nothing feels finished.
I was tired, impatient, and honestly close to exporting a photo I wasn’t happy with. The image was a night street shot, with neon signs, wet roads, and a subject standing under artificial light. The AI edits looked impressive, but they flattened the mood I actually felt when I took the photo.
So I did what most exhausted editors do: I searched, experimented, failed a few times, and finally slowed down.
That’s when I properly learned how to use the Brush inside Luminar Neo for a neon glow.
This article is written exactly how I experienced it:
What I did, what worked, what didn’t, and how it compares to Photoshop in real use, not theory.
Why I Stopped Relying on One-Click AI That Night
Luminar’s AI tools are powerful, but late at night, they can feel like:
- Too much change, too fast
- Effects applied where I didn’t want them
- A “processed” lookis creeping in
What I needed wasn’t more AI, it was control, without opening a complex layer stack.
The Brush gave me that control.
What the Luminar Brush Feels Like in Real Editing
The Brush is technically a masking tool, but in practice it feels like:
- Painting intent
- Directing light
- Fixing AI instead of undoing it
I don’t think in menus when I use it. I think in areas:
“This part needs glow. This part must stay untouched.”
That mindset is why the Brush quietly became central to my workflow.
Step-by-Step: How I Create a Neon Glow Effect (My Actual Workflow)

This is not a “perfect preset” method. This is how I do it when I want realism.
Step 1: Start Neutral
I never begin with heavy adjustments.
- Basic exposure corrected
- Contrast modest
- Colors balanced
If the base photo is broken, glow will only exaggerate the problems.
Step 2: Choose the Right Tool
I usually start with:
- Glow
- Structure AI (very lightly)
- Sometimes Relight AI for depth
I don’t apply anything globally yet.
Step 3: Enter Masking Mode
Inside the tool:
- Click Masking
- Select Brush
- Turn on the mask overlay so I can see where I’m painting
This visual feedback matters more than people realize.
Step 4: Brush Settings I Actually Use
Size: Medium to small, depending on light source
Softness: High (this avoids hard, fake edges)
Opacity: Low
Low opacity is the secret.
It lets me build glow slowly instead of flooding the image.
Step 5: Paint Only Light Sources
I brush over:
- Neon signs
- Reflections
- Light edges
Highlights on clothing or surfaces
I deliberately avoid:
- Faces
- Shadows
- Flat walls without light sources
- Glow belongs to light, not objects.
Step 6: Adjust Sliders After Masking
Only now do I move:
- Glow amount
- Warmth or color tint
- Contrast
Because the mask is already in place, nothing spills into unwanted areas.
Step 7: Clean Up with Erase
If glow leaks:
- I hold Alt / Option
- Switch to Erase
- Remove it gently
This is faster than fixing mistakes after the fact.
Step 8: Final Check
I toggle the tool on and off.
If I can immediately see the glow, it’s probably too strong.
If I feel the mood instead of seeing the effect, it’s right.
Why Neon Glow in Luminar Feels Different Than Filters
This approach doesn’t feel like applying an effect.
It feels like painting light where it naturally belongs.
That’s the difference between:
- Editing for attention
- Editing for atmosphere
How I Combine Brush with AI Masks Now
My regular workflow looks like this:
- Use Mask AI to detect subject or sky
- Switch to Brush
- Refine edges and light placement
- Adjust sliders carefully
AI gets me close.
The Brush gets me exactly where I want.
Luminar Brush vs Photoshop Brush
I use both. This isn’t brand loyalty, it’s practicality.
Control & Precision
Photoshop gives microscopic control.
Luminar gives practical control.
For most photos, Luminar’s brush is enough without technical overhead.
Speed
In Luminar:
- Open tool
- Paint
- Adjust
In Photoshop:
- Create layer
- Choose blend mode
- Mask
- Adjust opacity
Fine-tune edges
Photoshop is powerful, but slow when I’m tired or working in volume.
Learning Curve
Photoshop assumes you already understand layers and blending.
Luminar assumes you want results first.
At midnight, that matters.
Creative Flow
Photoshop feels like engineering.
Luminar feels like editing.
Neither is wrong. They just serve different mental states.
When I Still Choose Photoshop
Commercial retouching
Composite-heavy work
Pixel-perfect demands
When I Choose Luminar
Portraits
Night photography
Creative glow
Fast turnaround edits
Performance Reality
Luminar is heavier than it looks.
High-resolution RAW files
Multiple AI tools
Several brush masks
This combination demands RAM and an SSD.
On weaker systems, patience is required.
But compared to manual masking elsewhere, it still saves time overall.
My Personal Review Scorecard
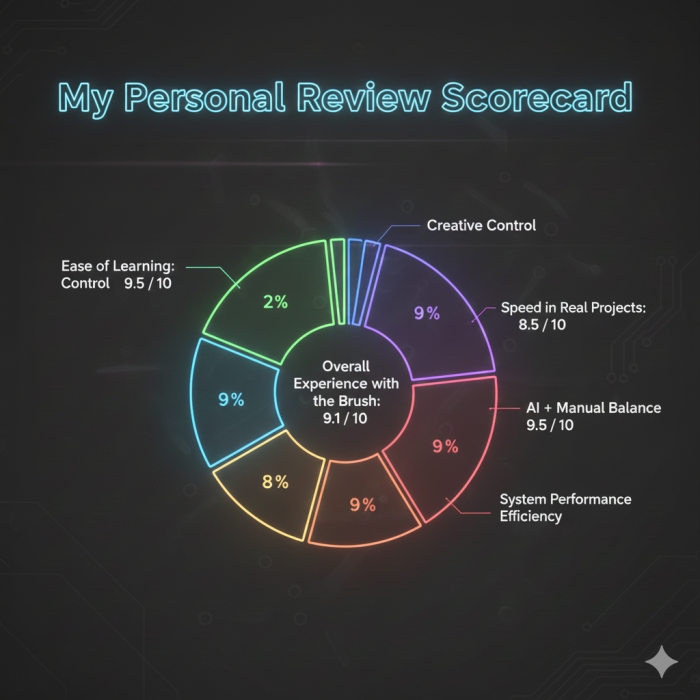
Ease of Learning: 9.5 / 10
Creative Control: 9 / 10
Speed in Real Projects: 8.5 / 10
Neon Glow Quality: 9 / 10
AI + Manual Balance: 9.5 / 10
System Performance Efficiency: 8 / 10
Overall Experience with the Brush: 9.1 / 10
Final Thoughts: Why I No Longer Edit Neon Without the Brush
That night taught me something simple.
AI is incredible at guessing.
But editing isn’t guessing, it’s deciding.
The Luminar Brush lets me decide:
Where light lives
Where it stops
How subtle it feels
I still use AI.
I just don’t let it drive alone anymore.
If you enjoy fast results but still care about mood, realism, and intent, this tool isn’t optional, it’s foundational.
Post Comments
Be the first to post comment!